Showing posts with label crafting. Show all posts

Tuesday, 9 April 2019

April Life Update; More Knitting Is Happening!


Hi readers, 

As promised here's some photos of the finished rainbow blanket and blue baby jackets. The blanket itself is too big to photo in one. It's really fluffy and soft, I'm actually sad to have to put it away in the baby box as I'd rather keep it for myself! 

I also got these two baby jackets done and I realised that knit-purl stitch is better for them as the flower pattern comes up more and also I only use one ball of wool to make them. They are so cute, though I as hoping a boy would be able to wear them but they look to girly with the flowers on. 


Because I love this brand of wool I got some more balls in different colours and as they knit up real fast, I made a four jackets in about a month! My favourite in is the mix pastels, I love the sunset effect. My second is the purple one which was called Lavender Fields. My lest is actually the pink one as the colour is like a hot pink and it's not a shade I like. 

I really like knitting this jackets and they turned out so well. 


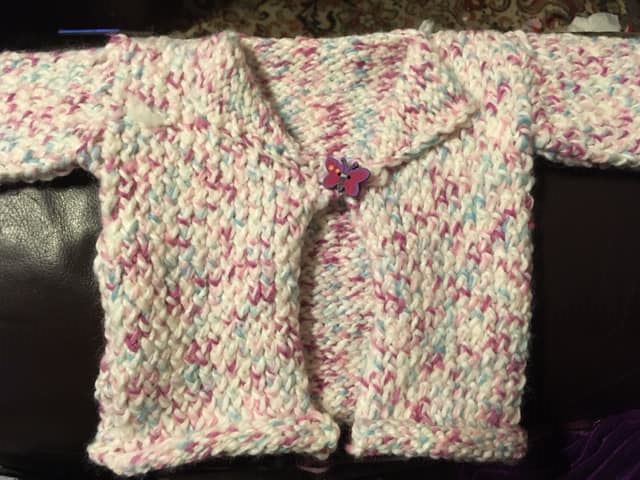
I made this cute little jacket after finishing those but I wasn't happy with the wool itself as it untwisted a lot and it wasn't as nice to knit with. I like the butterfly button on the front. 


My latest jacket to get finished is this blue and white one. I made it out of snuggly wool that's actually for blankets but mum brought it for me and didn't get enough of it, so we decided to make a sort of bath time / bed time jacket for a toddler from it. I also got to make a hood for the first time! I really liked making this and there's no shaping in it so it was simple to make. I just hope I can find a child that fits in it now. 


Big Blanket Project 

So sadden by having to put the rainbow blanket away, I decided to make a big blanket of my own! I looked through my stock pile for enough wool and found I had 12 balls of this blue/white mix which is actually like to the wool and colour I made the jacket above out of. 

I started knitted and with some help from my mum we decided to knit 3 panels made from four balls of wool as this would make a large enough blanket. I made a start a few weeks back; 


And last night, I finished the first panel off. Turned out longer then I thought it would do but it's not very wide which is why I need to get knitting the other 2 panels so then they can be joined them together. I shall keep an update of this but I've set a deadline for finishing it by the end of the month. 


In between knitting the big blanket, (I do sometimes get bored working on a long project) I have a new jacket to make. This one has a hood and the jacket itself is made in one piece. It also needed a new wool that I've not knitted with before- Aran. I choice the rainbow wool which is a cotton and then the other two are 75% wool. So I got new blends to work with too. 

I'm looking forward to 'levelling up' my knitting with this project.    


I actually have lots to keep me busy- probably for the rest of the year!- as a new wool order came in! This huge box is full of the blanket wool in a range of colours. My plan is still to knit blankets to sell, I just need to get around to it. 

Also, I got these two new squishes. They are so good for my anxiety and help me sleep better at night.  


Lastly don't forgot to check out my other blog; https://thestoryfiles.wordpress.com/ where I'm currently taking part in the A-Z blogging Challenge by writing a short story everyday based on a word writing prompt.

Also, here's a cute photo of my dog sunbathing. 


(All photos my own).

Monday, 12 September 2016

September's Life Update: 10 free Sewing Projects


Hi readers,

I've got a slightly different post to share with you all today. Originally, this post was about sewing projects you could do with kids during the summer holidays, but now summer is over and most of the kids have gone back to school. I still wanted to write this post though, so I thought why not aim it slightly more at Christmas? So below is a list of free sewing projects that I've done with the young people I work with at the youth center, which you can do by yourself or with family and friends as a fun weekend activity or you could make them for Christmas presents!

I used wool felt in all these projects expect the first one, which I used fabric. You could use anything you like to make these, but I find felt a lot more easy to work with -especially if children are doing the sewing. Also, I just noticed in editing this that all but one of these projects is a soft toy! But most of the patterns can easily be changed to make key ring charms or pillows or however else you want to change them. I think I just find it easy to make soft toys with the kids as they have basic sewing skills and of course, my work being a charity, we don't get a lot of money/supplies for arts and crafts.

I've included the links to all but one of the projects, so you can get the instructs and patterns. I hope you enjoy and find this post useful.


1. Hair Scrunchies


I found out how to make these from someone at work. She was teaching the Thursday craft group of 8-12 year olds how to make scrunchies and hair bands. Seeing how easier it was, I really wanted to make my own and so I give it ago a few days later and now I'm addicted. I'm always in need of scrunchies because I end up mis-placing them! So, being able to now make my own and use whatever pattern of fabric I want is really great. It's a good way to use up strips of fabric and I think they'd make nice small gifts for people with long hair.

Pattern: https://snapguide.com/guides/make-an-easy-hair-scrunchie/

YouTube Video I found useful: https://www.youtube.com/watch?v=dN-GpWWhjvk


2. Steggie


I found this little guy whilst looking for a triceratops because that's what I really wanted. I thought he looked too nice to pass up on though and so I got the pattern. I was meant to be making a big one to go with this small one, but I've not got around to it yet. Whilst the body parts are easy to do, sewing the spike plates on is a bit tricky. But he turned out well.

I've not made this with the kids yet, but I'd like too.

Pattern: http://nuno-runo.blogspot.co.uk/2012/05/stegosaurus.html


3. Minion


For weeks, the young people I work with on Tuesdays have been asking to make Minions. So I found a simple pattern for a small toy one and I give it ago. There are lots of bits to sew on, but you could glue them on. The kids really loved making them and made their own spin on them with one girl covering the bare 'bum' of her's with a white felt strip with penned in 'censored' Which was so funny. Since taking this photo I added in white dots over the eyes and buttons on his overalls. The H on the pocket originally stood for my name, but then I decided to name him Hogarth, which works well.

There are no instructions for the pattern because I think it's in Spanish, but it's not that hard to figure out what the shapes are and where they go.  

Pattern for Minion via Pinterest: https://s-media-cache-ak0.pinimg.com/originals/8f/3c/0e/8f3c0ec0c0529146a9b04e43148b7119.jpg

Pattern for clothes: https://s-media-cache-ak0.pinimg.com/originals/6d/ed/20/6ded20a2fc4c6ec40abf7e3d3cf61cd3.jpg


4. Mermaid 


This is another thing the kids had been bugging me for. It took my ages to find an easy pattern that was all in one piece - which I prefer and find it easy for the kids to do. I struggled so much that in the end I went with this one. The pattern is in Spanish- I think and so it was a little bit of a trail to work out the best way to fit the pieces together.

In the end, I went with sewing the tail, body and hair together on both the front and back then pinning them together and sewing it all up. Some of the kids choice to sew the three pieces with their matching parts together first then sew them to each of the other parts, but it was kinda tricky to do this.

Also I found the stars that are used to cover her chest not right for the kids, so we made 'bikini' style tops. Actually, mine never really got finished, I was going to give her a small skirt - to cover up my stitching and also put the flowers in her hair. To be honest, I'd like to try this one again and spend more time on it.

The pattern is here: https://www.flickr.com/photos/bonifrati/5425111743/sizes/l/in/gallery-lucienerosi-72157625867910218/


5. Ladybugs / ribbon bugs


I adapted this pattern to suit my needs as you'll see. It turned out that all the ribbon I had was Christmas themed and since we made this in June, I didn't think it'd be fitting. So I cut the wings and other bits out of felt instead. These were easy to make, but the kids didn't get into them as I'd hoped. I'm happy with the way mine turned out though.

Pattern: http://www.patchworkposse.com/ribbon-bugs-stuffie-free-pattern/


6. Horse/Unicorn/Pegasus 


I made this like last year because I wanted a unicorn but couldn't find a pattern for one. So I took this simple pattern of a horse and once I had made it just cut out a horn and then I also decided to add some wings. I think it was My Little Pony inspired. For the mane and tail, I decided to use some rainbow fur I had left over and it work well, though attaching it was a bit tricky.

I've not made this with the kids yet because it took me awhile and I found the sewing of the legs hard. I think most girls would like this though, so maybe in the future we'll make them.

Pattern: http://simmy.typepad.com/echoesofadream/2007/05/thank_you_so_mu.html


7. Fish and Seahorse


This is the one I don't have the pattern for. I couldn't find it because I realized that I'd just googled patterns for sea creatures and then picked the best ones. I made like a goldfish and the seahorse like two years back and I also started another goldfish which as you can see I never got around to finishing. Sewing the whole thing with sequence was taking forever.

So make this just find some plain images of the sea creatures you want, print them, cut out the shapes from felt and them just sew them together and decorate. I also made these smaller and the kids made key ring charms out of them.


8. Panda


I was watching Kung Fu Panda the other day and decided I wanted to make a panda soft toy. I love pandas and they are one of my favorite animals. I found two very different patterns, but I went with easiest for this post. Plus, kids can make this very easily and if they are not a fan of pandas it's easy to change the colors to make whatever bear you want.

I'd love to make this one bigger and out of micro-fleece or another soft fabric, so that he could become a pillow. That'd be really awesome. I love how he turned out and do think I'll be making him some friends soon.

Pattern: http://mollychicken.blogs.com/my_weblog/2005/11/anna_panda.html


9. Fox


This little guy would make a really nice pillow/cushion. Or maybe a pin or a key charm. I found him really quick to sew up too. He's sitting on my desk with my panda right now, but I sure wish I'd made him bigger because he'd be another good soft toy for snuggling with. He's be great for fox lovers.

Pattern: http://littlewhiteschoolhouse.blogspot.co.uk/2013/05/free-fox-softie-pattern.html?m=1


10. Day Of The Dead Doll


It's nearly Halloween! So, when I came across this doll I knew I had to make her. She took me awhile and I do think that glueing the bones ect on would have been easier, but I do find hand sewing relaxing. I'm really pleased with how she turned out as I struggled to get the pattern pieces the right size just due to my computer. She's not as complicated as she looks to make either, it's just the time needed.

Pattern: http://www.aestheticnest.com/2014/10/craft-day-of-dead-doll-free-pattern.html


Surprise bonus; knitted Dragons.

Lastly, does anyone remember the knitting patterns I brought in Leeds? Well, my mum has been busy making these guys! She also made the rainbow hedgehog, but I forgot to take a photo of it it. I so want to make a small hedgehog by myself at some point though and aren't the baby dragons so cute?


This all for this week, thanks for reading and please come back soon. Feel free to share you thoughts below. 

Monday, 27 June 2016

June Life Update: Home Improvements.


Hi readers,

It feels like an age since I last did one of these posts and I've been so busy! But also, the Soulless books have been taking up the last few weeks. I actually got the idea for this post at the end of May/ beginning of June, but actually I'm glad I didn't post it up then because it's meant I've had more time to write it. However, it's now become a lot longer then I first planned, but I've got lots of photos to break things up with. So let's start! 

Last month my old desk chair broke. It had been on it's last legs/wheels for awhile but one night as I sat in it singing along to Five Finger Death Punch, the chair snapped in half and threw me against my bookcase and floor. My foot was trapped underneath the seat, but luckily, I got free and after a few minutes of laying on the floor I got up. My chair was announced totally broke by my dad and so began the search for a new one.

I had this idea that I wanted like a comfy plush armchair, but all the ones I looked at online, in charity shops and furniture shops were not desk height. My mum took me to IKEA for the first time as the last place to look. We arrived at the right floor and the first thing I saw was someone being told off by a member of staff for using the wrong trolley! Seems the long flatbed ones could only be used on the floor below and not in the home area.

Visiting IKEA for me felt like visiting a number of different houses. I love how you can just walk into a living room or kitchen etc and take a good nosy around. You so get a really taste of what you could make any room in your own place look like and I enjoyed that experience, even though it felt a bit weird and it took me awhile to actually step into one of the rooms.

I saw a number of chairs I liked, but none of them ticked all the boxes either because they were too small for me - I need a big chair because I like to curl up and I do move around a lot, plus I spend a lot of time at my desk- or they weren't the right height or they were too expensive. So, even though I saw lots of cool stuff, I didn't get anything. I think when I've a place of my own, then I shall go back to IKEA. The bookcases were awesome!

In the end, I went back to the internet and looked on Amazon. It really is my go to place when I want/need to buy things. Finally, after a lot of researching into desk/computer gaming chairs, I went with this one;


I know the photo isn't that great. The sunlight appeared at the wrong moment and I've just not get around to trying again. Plus it's really tall, so actually getting a full photo of it without showing the mess my front room is currently in is hard. So, its a computer gamer's chair with fake leather and plush panels that actually have an autumn leaves print on them and I do so love autumn and leaves! It's super comfy, really supportive and it was well within my budget. I'm happy with it and hope it lasts an age now.   

On to the second thing. For anyone who's been reading this blog awhile you'll remember my addiction to cacti. I have a huge one called Bob, who I took to uni with me and it was given to me by my now passed away uncle as a small baby. Well, I decided he needed re-potting again. This is like his fourth new pot now and he seems to suit it. Sadly, I think I choice the wrong time because he was flowering- as you can see below- and normally he gets large pink flowers on all his tops, but it's not happened and they have started dying. I hope he's going to be okay. 


The cacti in the photo at the start of this post are all my new ones. They were really cheap from a supermarket and I couldn't say no to that. I re-potted the one that looks like Bob in his old pot to encourage him to grow big. It's the same for the cactus next to Bob in the above photo. It looks big already, but I want it to grow more. They all look really good on the window sill which is next to my desk and computer. I added the bunnies from one of my old posts next to them as I've been sewing so much new stuff lately that I've run out of room.

The cacti below I've had for awhile and actually they are the only ones that I didn't re-pot. That's because I'm pretty happy with them as they are. They haven't grown much though, expect for the two tall ones at the back, they seem to be doing really good. The cactus in the middle is a special one I got from the Eden Project in Cornwall on my birthday. I did have another one that was orange which I got from my first trip but it sadly died. I've no idea why though! The other cacti came from a garden center and it's the same place I got the seashell stones from. I like them because they just add some color and decoration on top of the soil.


One of the things I love about summer is all the outside decorations you can get. This year my mum and I decided to buy some new solar lights for the trees we have in the garden. I went with stars as I really like them and they do look good. Then I choice some twinkling fairy lights to make like an archway between the trees. That turned at really well. I love waiting for them to come on and though they've not been so bright recently due to lack of sun -feels like another washed out summer in England- they still look good.


At the same time, I also got this which is meant to be fireflies in a jar. I love the effect and I have it inside on my window sill, balanced on a cactus pot during the day then moving around my desk in the evening/night, so I can enjoy it. I really like it and also it could easily be made with a jar and some lights, but this was super cheap! 


To fit in with this I recently brought some new LED fairy lights for my seashell collection. I have always collected shells when I've been at the seaside. I try to get the ones that I think sea creatures won't want to use and then I only take a few. I've also brought some too. They use to live in a shoe box under my bed, but a few years back I decided to get a large glass vase to put them in. I then brought a string of 20 fairy lights to put in with them and it's stood on the end of my desk under my bed for ages. 


A few weeks back whilst tidying my room I decided that I'd love this on my PC desk where I could have the lights on more often and enjoy it more. So I brought it and my large lava lamp, which I felt the same about to my PC desk. It was there after having it on a few times I decided that it would Benefit from having more lights in as only the middle section was really lit up. So, I went on Amazon and got some. 

It's taken me four tries to get it right. The problem was I got 100 lights when before there was only 20 and the wire was really thick, so twice all the shells won't go back in and the third time I decided that I didn't like the arrangement of things. It took a lot of thinking, but I'm happy with how it turned out. Also, having just the blue and green lights on gives a really nice affect.   


My younger brother moved back from uni about two weekends ago now. He wanted to sort though the corner wardrobe that's in his bedroom. I ended up giving him and my mum a hand, we found a lot of interesting stuff and were able to get rid of most of it. I still have some books and a bathroom stuff to give to charity. Though what I really want to do is raise some money for arts and crafts supplies at the youth center. Going to have a look into doing that very soon.

Among the finds we discovered these two Charlie bears! Mum said she was sure one of them - the panda on the right had been a Christmas present for me she had lost a few years back. The other shares the name of my other brother and that's why she got him, but for reason he then got left in the cupboard. I'm glad to say that both bears have now joined all the others in my bedroom. 


The other thing I wanted to write about were these Dungeons and Dragons Role Playing books. I had for sometime kept three of them in my room on the top shelf and we found the fourth one in an old box of childhood books. I'm not sure how it got there! They date from 1992-1993 and were meant to be used with the 1990 D&D board game as additional adventures.

We don't have that board game and though it's easy enough to get one, I'm thinking I might sell them. Right now they are coming up as being somewhat expensive. Seems there's a surge in old D&D stuff.

But I feel kinda attached to them and I don't know why. Maybe it's got something to do with the geek in me and I keep thinking I could keep them, get the board game and find some people to play it with. On the other hand, that's unlikely to happen and maybe someone who wants them for memorabilia and knows about them better then me will want to buy them? 

I don't know, but I'm storing them inside my small bookcase next to my desk till I decided. Take a look at these maps though! I've got them for each different adventure and I love the detail in them.   


To tie in with this when I cleaned my bedroom last month I found these novels. I knew I had them as they were giving to me by a high school friend back in the early 2000's. I just about think I've read the vampire one, of course it's about a vampire so why wouldn't I? But I've never read the others. I got them before I knew what D&D was and I think I just thought they were fantasy books like the role playing ones I got at the same time, but now I know them for what they are and I like them a lot more.

They are on my to read list now. Strangely though the D&D adventure I'm playing right now is linked to the vampire novel as we are playing The Curse of Strahd and that novel is based on the original adventure. I think one of the reasons I've not started reading it is because I'm worried there might be information which could be seen as meta-gaming actually in the novel. So I'm going to wait until the adventure is finished and then read it. Also, I've a huge pile of books to get through right now! If you're interested in playing D&D here's the link to the website;  http://dnd.wizards.com/

And I'm sure I've wrote a lot about how playing D&D has changed my life in the past, so I won't go into that all again here. I've got three things left to write about now and then I'm finally finished. 


So, recently, I've become really big on products from The Body Shop. I have also loved their strawberry wash stuff and lotions and the orange one they have too. At Christmas I got into their apple scent and now with summer under way, they have brought out a range of pina colada - pineapple and coconut stuff and that's like my second favorite smell. I'm totally in love with it! Also they have some hand cleaners, which I love too and carry around with me wherever I go.


The other product I'm addicted to is the peppermint foot treatments. I love the smell of it but also my feet have so improved using the deep intense cream. When I was a ballerina I never kept on top of my foot care like I should have done and now I've become super aware of the pressure points on my feet, eg. the heel and base of my toes. With wanting to wear sandals - despite the rain now taking over the summer- I thought I should start giving my feet some TLC. So far it's really working and my feet look better then they have in years. 

Last week, during one of my first meet ups with a guy from an online dating website, ( I was going to write all about my 'first' dates and how my mentoring Sunday's are going, but this post is too big all ready so I'll carry those over to a second July post I think as the first July post is about all the sewing projects I've been doing) I had a shopping trip. I don't normally spend so much money at once, but I wanted get a few things anyway and then I found more. 


I needed some strips of fabric to make my new craze of hair scrunches. I learnt how do them from the fabric activity volunteer at the youth center and when I made my first one I become hooked. So now I've got all this awesome fabric to make some more!    


A few posts back I wrote about my happy book and how I fill it with positive quotes/Menes and things that make me happy. For awhile now I've been looking to get another notebook to continue the happy book in as it's almost full now. I spotted the small two notebooks on a top shelf in The Works and decided they were too cheap to pass up on even if they didn't become the next happy book. Also the inspirational quotes drew me in. 

The white book behind them is actually a design your own cover book and though it's too big really to be my new happy book I liked the idea behind making my own cover and also it's plain paper inside, unlike the others which were lined. So, maybe it's work as my new happy book? Have to see when I actually need to switch out.


I also got these books too as they were very cheap and I thought the two sewing books would be great inspiration for my job. Some of the projects in them look pretty good and I thought it'd save me sometime looking on the internet. The other book is about funny newspaper headlines and yeah I was drawn in by the custard shortage line. I thought this would be useful for writing prompts. One of the things they say to look at is news stories and I like the sound of some of these headlines. There was one about a dog being attacked by swans, a man being found dead in a graveyard and one about boiled egg exploding. I also thought if I need a giggle then it'd be good for that. 


I also brought the new J .R. Ward series book 1! It was on my birthday wish list, but with Waterstones giving it a buy one get one half price sticker I thought I'd get it then find another one. It took me awhile as the selection they had wasn't great for me, but I decided to get the home for peculiar children because I had seen the ad for the movie on tv and though I have actually looked at the book a few times I didn't know it was about children with supernatural powers. So I thought I'd give it ago. Two more books to add to my reading list!

I'm close to finishing now, there's only one more thing I want to write about and that's; 

Up and Coming Book Reviews. 


So, I just thought I'd share this list of some of the books I plan to read and review for the rest of the year. Of course, this list isn't set in stone and a few others will pop up. I've tried to do it by month too, but this no doubt will change. If you want to keep up with what I'm reading here's the link to my Goodreads page: https://www.goodreads.com/user/show/7400715-hayley-hardman

End of June, but reviewing next week as one post; Soulless Manga Trilogy.

July; Gail Carriage The Custard Protocol book 1 and 2, J .R. Ward Blood Kiss.   

August; Darren Shan's The City Trilogy, Stephan King's Joyland and Cujo.     

September; Joseph Fink Welcome to Night Vale Volumes 1 and 2.  

November; The above writing books as it's write a novel in a month time. 

October; J .R. Ward The Beast.   

December; To Be Decided.

That's all for this update. Thanks so much for reading and if you have time please check out my other blog were I write a short story everyday https://thestoryfiles.wordpress.com/. Next month, I hope to launch a new blog which will also be on Wordpress and I want to get the first collection of short stories from my blog self published on Amazon too. 

See you next week. :) 

Images: all my own. 

Monday, 7 March 2016

March Life Update: Getting Crafty!


Hi readers,

I've been so busy over the last few weeks, so this weekend I thought I'd take the time to have a chill. One of my favorite things to do is sewing. I love making little soft toys, key rings and coin pouches. I decided as Mother's Day was yesterday in the UK, I'd make my mum some of the stuff I'd recently been looking at for making with the young people at the youth center. I had all ready made a white bunny, a pink bunny keyring and I re-did the owl coin pouch from last month. I was so not happy with how it turned out, so I made the pattern bigger and give it another shot. It turned out a lot better!

I wanted to make cute bunnies with kids for Easter, but I need something quick and simple. These 'Giving Bunnies' met all my needs and can be found here: http://www.urbanthreads.com/blog/?p=7487. They are really easy to do, so easy in fact that you might end up with a family of them before you know it! I loved adding the bows and the knitted scarfs because it just finished them off. The love heart one was originally meant to have patchwork strips on her, but it didn't turn out as I wanted, so I cut the hearts out and sewed them on.

My mum really loved her's and now I'm hoping the kids at the youth center will do too! I brought the fabric and I went with micro-fleece instead of felt because it's softer and worked out cheaper to bulk buy. I'll be cutting out the bunnies before hand because it'll be easier and the kids just have to sew them up. I won't be knitting scarfs for them all though! But they could put other things on if they wanted.

The second bunny pattern I picked is super cute and is made up as keyring. though you could always re-size the pattern if you wanted create a soft toy or a pillow. The first one I made, I used the stitches the instructions suggested, but it wasn't neat enough for me and I found it hard to keep things the same. I decided to blanket stitch the second one -I made for my mum- and that turned out so much better. Here's the link: http://www.michaelannmade.com/2012/03/little-peep-pal-diy-with-pdf-pattern.html?utm_campaign=sniply

I think for the kids I'm not going to do the strip/gusset to make them 3D, because I found it tricky and I imagine that they'd find it far too hard and just give up. So, we'll be making them flat then stuffing them to give them a little depth instead. I got pink micro-fleece and shall be cutting them out too. I wanted to get some blue for the boys or those girls who didn't want pink and I was unable to because it wasn't half price like the white and pink and I didn't want to spend a lot of money. (I can claim my money back via the resources department, but as the youth center is a charity I always feel a bit bad about claiming money back from them). I'll offer blue felt instead, I think.


I was going to make an owl coin pouch for my mum like my re-did one, but I found this one and decided it looked a lot better; http://www.dosmallthingswithlove.com/2014/10/felt-owl-coin-purse-hidden-closure.html I love the hidden button and it turned out great. I know I should have used matching thread for the eyes, but I wanted to give it that homemade look. My mum really liked this and said she was going to put £2 coins in which she likes to collect. It also matches the bag and purse I got her at Christmas. I have half fancy making one for myself, but I really don't have need of another coin purse right now! I know I friend who might like one though....

Also, here's the one I re-did! It turned out a lot better and I can actually fit money inside of it. I added some stuffing to the wings and eyes because I didn't like how flat it looked. The pattern can be found on the same website as the other one.


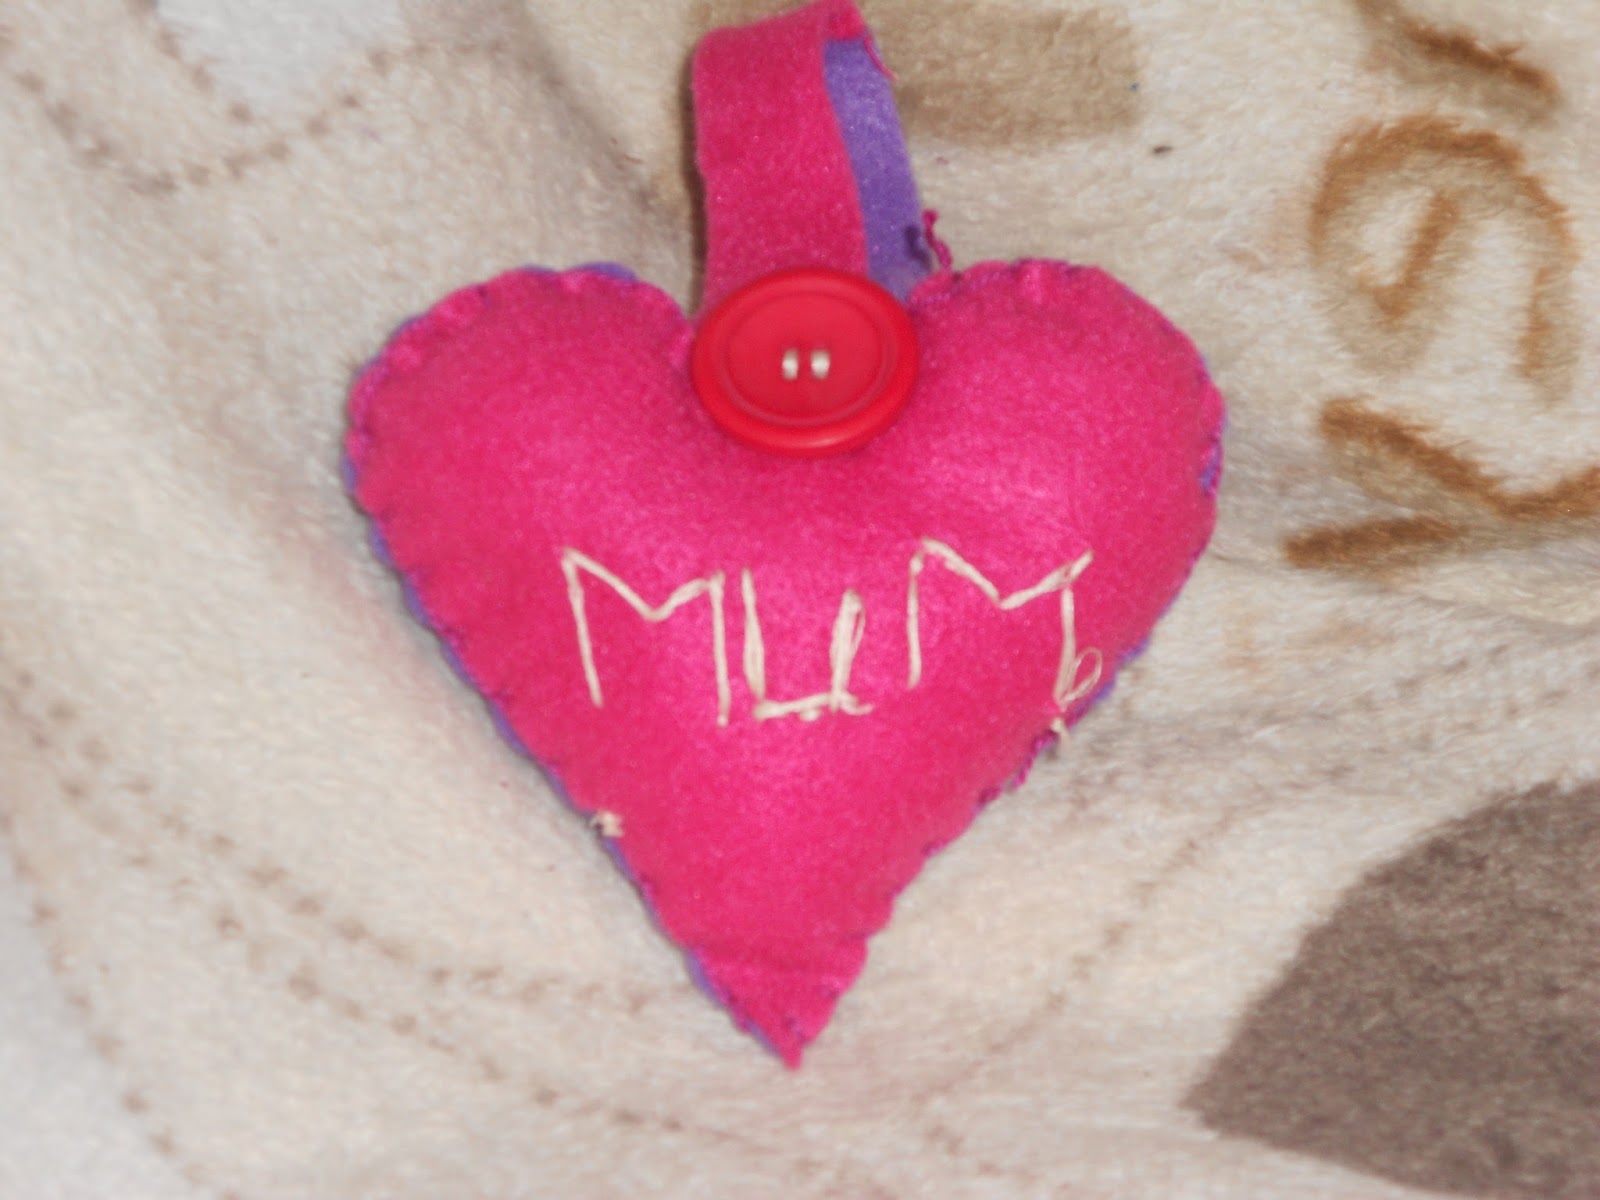
Lastly, I made this felt love heart with a hanger and stitched mum on it. I made these with the kids last Tuesday. I'd actually wanted to make mini no sew heart cushions, but I got the pattern size wrong and it only works with like A4 size, which would have meant using up too much felt at the youth center and then I know some of the kids can't tie knots, so I went for an easier option. We made these and put dried lavender and scented beads, which I had left over from ages ago when they made the scented pouches. The kids really seemed to like them. My mum likes her's too.


Today, I made a felt Pusheen kitty. The pattern has been on my desk since I printed out the other stuff and though I'm not a big fan of cats, it looked like another things to get the kids at the Factory to make. Though I'll have to make the pattern simpler because it is a little complicated. The guy's tutorial video is bad and after I watched it I just made Pusheen up as I would a normal 3D soft toy. I don't get why he cuts off the feet and stitches them and the belly on separately and the space he leaves for turning kitty the right way and stuffing is far too small!

So, if you're going to make this, I'd say watch the video to get understand where all the pieces go, then just make it up how you'd normally do. Here's the links: http://grnmarco.deviantart.com/art/Pusheen-The-Cat-Template-367261676
https://www.youtube.com/watch?v=2gckh0vI-i4

Mine turned out okay. I know I didn't get the mouth right, maybe I might change that later and yeah, I did glue all the black parts on. It was so much easier then sewing due to the fact they are small. I think for the kids, I'd just get them to make it flat or with just the belly gusset. Doesn't the little tail look so cute though?


The second part of update post is that I finally got around to making two pieces of art! I'm no artist, in fact I'm super bad at drawing and art as a whole. I know I do a lot of arty stuff with the kids, but it's normally simple easy stuff. I saw these two projects on Pinterest and decided that I wanted to give them ago even if I didn't do them at the factory.

The first is this sun catcher photo frame where you use food coloring and glue to paint on the glass. I thought it looked very effective and easy for the kids to do. It can be found here: http://www.smartschoolhouse.com/diy-crafts/stained-glass-art#_a5y_p=3565407 I won't be using mine as sun catcher as I've not got any place to really put it at the moment. I just like it in the frame, it looks really pretty, though of course of the sun coming through it'd light up real nice. I also thought it'd be a great way to use up old photo frames - if anyone's got any laying around. I can image the kids getting very hands on with doing this! They love making messes!

Mine was still wet this morning and the red -maybe I used to much? - had really bled into the other colors. I only used red, yellow, orange and blue, but they seemed to have mixed together too much. I've put it on the heater to finish drying now, but I'm thinking maybe I might try again and not add red. Though then I'd have another photo frame that I couldn't really put anywhere! I'm thinking you could do this was glass paints and glitter glue too and that's probably what I'll use with the kids because my fingers are now stained red...


The next thing is my button tree! I've been talking about doing this since last September/November and yesterday, I decided it was time to make it. Unfortunately, the image I'd picked to copy, I can't find anywhere! It was a purple and pink dripping together background with the tree in the center. I had to use this one instead http://craftsbyamanda.com/vibrant-button-tree-on-canvas-a-giveaway, but of course I didn't make mine look like that because it seemed to take on a life of it's own...

I'm okay with how it turned out, but I wish I'd made the tree trunk smaller and got more branches and leaves/buttons at the top. I'm sure it'll look fine on my wall though, which is what I wanted it for. As a DIY art piece it was cheap to make. I got the canvas for £3 as it was on sale, the paint was £1 a bottle, I used four bottles as I added some black glitter paint on top and I used some for the paint before to make the Halloween/Christmas jars. The buttons I paid £4 for 200 grams off Amazon and I've LOT left over! So, it was about £11 all together and it took me about 3 hours to make including paint drying time. The buttons need over night to dry, of course. I might look at making another one or I've seen like four canvas together to make the four seasons and I really like the look of that. I need more wall space first though!


So that's everything I've been up to, but I got one last thing to share for today. A few weekends back now, I saw this knitting pattern for a whale in one of my mum's knitting magazines and I just fell in love with him and had to have him. We got the wool really cheap and he only took a weekend to make up. I love him so much and use him as a body pillow. He's like 3 foot long and takes up a quarter of my single bed! I swear I've been sleeping better with him too. He's got a snugly underside and the top of him is getting softer the more I rest my head on him. This photo doesn't really show how huge he is, but he's taking up two seats on the corner sofa and that was the only place I could find to put him for the photo!


Currently, my mum is knitting me a sparkly purple triceratops. I was hoping she'd be finished in time to write and show today, but mum didn't want to mess up the last of the horns and sewing her together, so I'll have to wait. Though that's okay because I've got a felt stegosaurus to make. I really wanted to make a felt triceratops but couldn't find any free patterns and the cheapest ones to download still seemed expensive to me when I could have a go at making my own. As it turned out, mum got the knitted pattern for free and I decided I liked it so much that it'd do instead.

So that's all for now. Thanks for reading. Next week is meant to be a book review, but I only just finished The End Of Days, so I'm not sure what'll pick up to read tonight. In the mean time please check out my other blog, where a write a short story everyday.

Links:

For the patterns;
http://www.urbanthreads.com/blog/?p=7487
http://www.michaelannmade.com/2012/03/little-peep-pal-diy-with-pdf-pattern.html?utm_campaign=sniply
http://www.dosmallthingswithlove.com/2014/10/felt-owl-coin-purse-hidden-closure.html
 http://grnmarco.deviantart.com/art/Pusheen-The-Cat-Template-367261676
https://www.youtube.com/watch?v=2gckh0vI-i4
http://www.smartschoolhouse.com/diy-crafts/stained-glass-art#_a5y_p=3565407
http://craftsbyamanda.com/vibrant-button-tree-on-canvas-a-giveaway/

Me on Pinterest: https://uk.pinterest.com/hails9/
My other blog, The Story Files: https://thestoryfiles.wordpress.com/

Photos:
All my own.